I still remember the first time I tried to recreate that familiar, wholegrain snap at home. I wanted a small-batch, from-scratch treat that kept the classic nutty note without wheat or oats. So I set out to craft a simple, reliable recipe that anyone can make in a standard American oven.
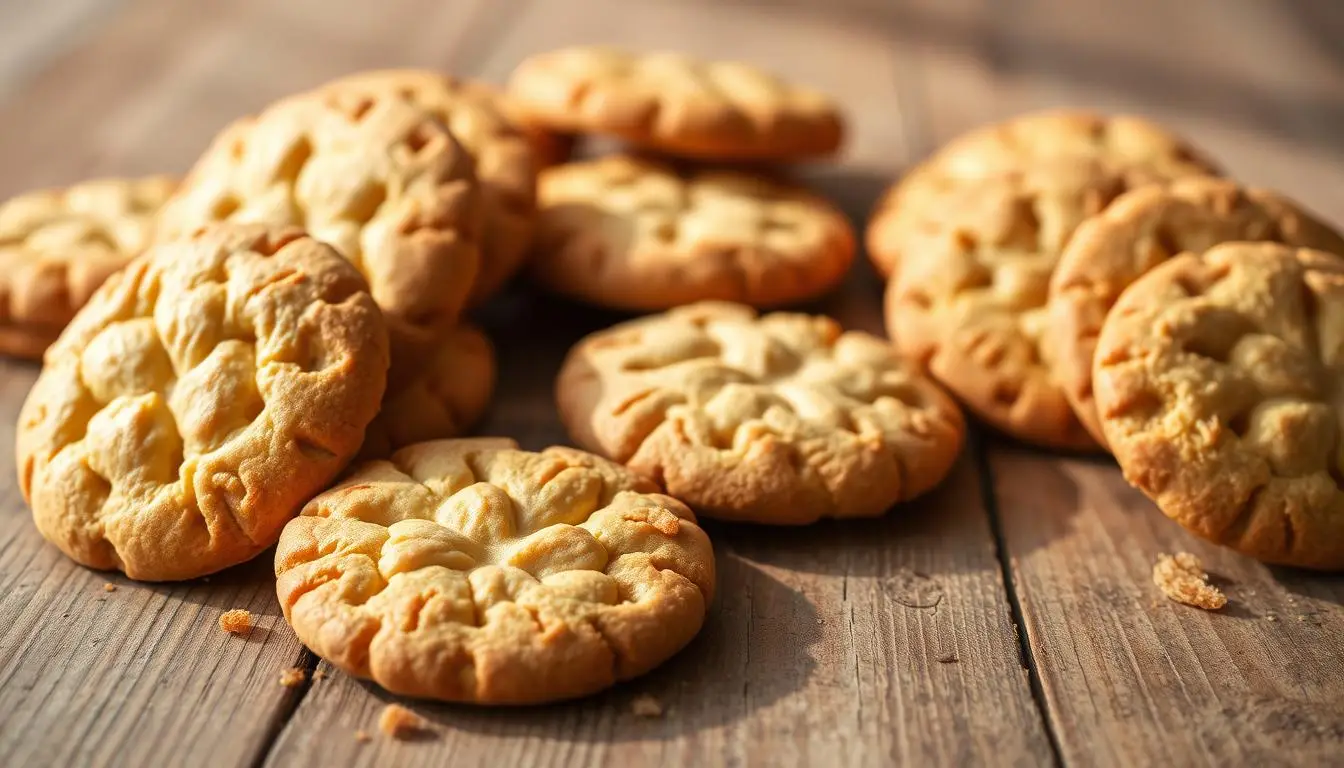
In this introduction I share what to expect: crisp edges, a tender sandy crumb, and a warm, nutty flavour from toasted quinoa flour and almond meal. These biscuits shine as an everyday snack or a base for cheesecakes and layered desserts.
The method is straightforward: whisk dry flours, rub in cold butter, bring the dough together, chill, roll, cut, bake, and cool for peak crispness. I’ll also offer timing in Fahrenheit and simple visual cues so your results stay consistent across kitchens.
Read on for texture tips, flavor tweaks, storage advice, and a comparison to store-bought versions. I’ll walk you through intuitive dough handling so you can trust your instincts and enjoy the process.
Why I Bake Gluten Free Digestive Biscuits at Home
I learned to make a reliable oat-free version after testing dozens of mixes and bakes. I want a simple, nutty result that echoes classic digestives but skips wheat and oats.
Home baking gives me control: I choose clear ingredients, lower sugars, and swap syrups or oils common in packaged food. Small tweaks in time or a splash of milk fix dry climates or warm kitchens.
I developed this recipe because oats are not considered safe for coeliacs in Australia; their proteins can behave like gluten. For readers avoiding oats, an oat-free biscuit keeps the crunch and flavour without risk.
- I test texture until the crumb behaves predictably in a home oven.
- I use a food processor sometimes, but I prefer hand mixing for better feel and control.
- I can scale batches, adjust bake color, or dip the biscuits in chocolate after cooling.
| Method | Speed | Control |
|---|---|---|
| Hand mix | Slower | High |
| Food processor | Fast | Medium |
| Store-bought | Immediate | Low |
Making my own nurtures baking intuition. Later sections show ingredients, texture tips, and step-by-step instructions for the full recipe.
Ingredients That Create Classic Digestive Flavor and Texture
Getting the flour blend right is where this recipe wins or loses for me. I build the dry ingredients around toasted quinoa flour, almond meal, and tapioca flour so the base has a nutty backbone, tender crumb, and light bite.
Toasted quinoa flour gives wholegrain flavour; I grind quinoa at home and toast the flour to a light golden to avoid off notes. Almond meal keeps the crumb tender, while tapioca adds spring and binding.
Light brown sugar brings gentle molasses notes and color without over-sweetening. I keep salt small so it lifts the toasty flavour.
I rub cold butter into the flours until no streaks remain. This step controls spread and creates a sandy texture. I add milk only if the mix needs a little hydration to form a ball.
- Baking powder adds delicate lift for crisp edges.
- Xanthan gum at about 5–6 g is the right amount for structure and snap.
- You can mix by hand or use a processor, though I prefer hand mixing for feel.

Also See This Article: 10-Minutes Best No Equipment Home Workouts to Stay Fit at Home (Easy & Effective)
Tools, Prep, and My Recommended Setup
I set up my counter the same way every time so the bake runs smoothly. A tidy station makes it easy to move from mixing to chill to roll dough without the mix warming up. Good setup saves time and gives consistent colour and snap.
By hand vs. food processor: I usually mix by hand for feel. Using a food processor or processor helps if you want speed; pulse carefully so the butter stays cold. I find hand work helps me judge when the dough is right.
Oven, trays, and cutters: Preheat the oven to 180°C / 356°F and make sure it’s fully hot for at least 10 minutes before baking. Line a large baking tray with parchment to prevent sticking and to help even browning. I use a 6–7 cm cookie cutter; a standard can near 7 cm is a handy cutter stand-in.
“Organise tools, chill quickly, and transfer cut pieces with a bench knife for neat edges.”
- Mixing bowl, whisk, scale, and a lined baking tray keep things simple.
- Work the flour blend before adding butter so the dough hydrates evenly.
- Keep tapioca flour for a light dusting, and watch oven time and rack position for even colour.
Gluten Free Digestive Biscuits
When I mix this dough I focus on even texture and a light, sandy crumb. I whisk the flour blend, almond meal, baking powder, xanthan gum, and light brown sugar until the mix looks uniform.
Rub in cold butter with your fingertips until no streaks remain. The mix should feel sandy; this creates flaky layers and helps the cookie hold shape during baking.
- I bring the biscuit dough together by pressing and folding. Add milk 1 tsp at a time only if dry patches persist.
- I wrap the ball and chill 30–45 minutes so fat firms but the dough stays pliable.
- I lightly flour the bench, roll dough to 1/2–3/4 cm, and cut 6–7 cm rounds with a cookie cutter.
Transfer the cut pieces to a lined baking tray and chill briefly if the kitchen is warm. Bake in a fully preheated oven at 356°F (180°C) for 10–13 minutes until edges are light brown.
Cool completely on the tray: this lets structure set and the crisp snap develop before storing.
Mastering Dough Texture: From Bowl to Perfect Cut Biscuits
My test for perfect dough is simple: it should feel like soft play clay in my palm. I look for a smooth, cohesive mass with no loose flour in the bowl. That play-dough feel means the mix holds together, is slightly moist, and will chill ready to roll.
Play-dough feel vs. crumbly
A crumbly mix shows dry edges and bits that won’t press together. If that happens, I add a teaspoon of milk and rework by hand until cohesive. Small additions beat watery fixes.
When the dough is too wet or too cold
Tacky dough that sticks to your fingers needs brief chilling and a light dusting of flour before you roll dough. If butter warms while mixing, pop the dough into the fridge so the fat firms and structure returns.
Cracking, warmth, and timing in the fridge
Fine edge fissures are normal, but a deep center crack means the dough is too cold—let it rest a few minutes at room time before resuming. I roll with gentle pressure and quarter turns to keep layers from tearing.
- Test one biscuit first to check thickness and bake result.
- Work in short bursts if your kitchen is warm; chill between batches.
- With practice, feel and small tweaks give clean cuts and even bake every time.
Flavor Tweaks and Results I Recommend Using
I tune butter and sugar to match the role I want the biscuit to play—snack, dunk, or dessert base. Small changes alter spread, colour, and mouthfeel in predictable ways.
Butter range and outcome
110 g of butter gives a slightly drier, cracker-like bite. Use this for sturdy dunking biscuits.
125 g creates a richer, more indulgent biscuit with deeper toasty finish. If you choose 125 g, chill the dough after cutting to prevent excess spread.
Sugar and how it moves the bake
50 g sugar keeps things just sweet and controlled. 75 g tastes sweeter and encourages spread. If you push sugar to 75 g, chill longer and nudge warm rounds back to shape with a glass if needed.
Structure: xanthan gum amount
I use 5–6 g xanthan gum. Five grams works well for leaner mixes. Six grams helps when both butter and sugar are at the higher amount for better cohesion.
| Variable | Low | High | Effect |
|---|---|---|---|
| Butter (g) | 110 | 125 | Dry to rich mouthfeel |
| Sugar (g) | 50 | 75 | Less spread to more spread |
| Xanthan (g) | 5 | 6 | Structure amount for dough |
| Chill tip | Short | Extra | Tighter edges on warm days |
Recommend using the combo that fits your goal: leaner for dunking, richer for dessert builds. Keep a baking note on butter, sugar, chill time, and flour so you can repeat the result you like best.
Substitutions, Oats, and What I Don’t Swap (Yet)
After nearly a hundred test bakes, I don’t offer swaps for almond meal or xanthan gum. Removing either made the dough dry or crumbly in repeated trials. For now, these ingredients are non-negotiable if you want consistent biscuits.
This recipe is intentionally oat-free. I use toasted quinoa flour to provide the grainy, nutty flavour many expect from a classic biscuit without oats. That choice keeps the texture close to traditional while staying safe for readers avoiding oats.
I am exploring alternatives like tigernut flour and psyllium husk in future tests. I won’t recommend them yet because each new flour forces rebalancing of liquids, butter, and binders to keep the dough cohesive.
- Stick to the specified ingredients and ratios for the best first-bake result.
- Experiment within allowed ranges (butter, sugar) rather than changing core flours or xanthan.
- If you need a nut-free option, note this blend won’t meet that need today.
“Small tweaks to hydration and chill time are safer than ingredient overhauls.”
In short: the flour matrix matters. Swap thoughtfully, or wait for a purpose-built recipe that targets those constraints. My recommendation is to follow this version until tested alternatives prove as reliable.

Also See This Article: 8 Must-Have Fitness Top Long Sleeve Picks in 2025 | Boost Performance
Quinoa Flour Notes: Toasting, Grinding, and Avoiding Bitterness
I treat my quinoa milling and toast as two linked jobs rather than separate chores. Do the grind first, then toast right after for the best aroma and colour. Freshly made flour tastes brighter and helps the final cookie brown evenly in the oven.
Homemade flour in a blender or processor
I grind whole quinoa in short bursts, pausing so steam can escape between cycles. This prevents a soggy mass and gives a fine, even particle size that blends well with other flours.
Toast to golden, not dark brown
Toast the ground flour to a light golden shade to amplify nutty flavour and remove grassy notes. On the stovetop you must stir constantly; the oven takes more minutes but is gentler.
- Small batches stay fresher and are easier to colour-check.
- Rinse then oven-dry quinoa at 320°F for about an hour if you want saponins removed.
- Avoid dark brown—bitterness transfers straight to the biscuit and cookie.
| Method | Speed | Control |
|---|---|---|
| Stovetop toast | Fast | High (watch closely) |
| Oven toast | Slower (more minutes) | Even colour with rotation |
| Store-bought flour | Immediate | Risk of rancid flavour |
Nutrition and Ingredient Context Compared to Packaged Digestives
I compare my pantry-made approach to store labels so you can see trade-offs clearly. Packaged versions often list many sugars (cane, golden syrup, demerara, molasses) and oils such as coconut oil.
My short ingredient list focuses on toasted quinoa flour, almond meal, tapioca flour, measured butter, and one sugar. Many commercial bars rely on rice flour and corn starch as primary flour bases and include gluten free oat flour and bran.
“Ingredient transparency gives you control over sweetness, fat, and texture.”
- Binder: labels often show xanthan gum; I use 5–6 g of xanthan for cohesion.
- Nutrition panel (typical packaged): 463 kcal, fat 19.9 g (saturates 17.7 g), carbs 66.7 g (sugars 17.7 g), fiber 2.5 g, protein 4.3 g, salt 1.0 g per 100 g.
Your homemade numbers will vary with butter and sugar choices and final cookie size. I swap syrups for light brown sugar to control spread and sweetness. If you prefer a less sweet result, choose the lower sugar option and bake slightly paler for a grain-forward profile.
| Feature | Packaged | Homemade |
|---|---|---|
| Primary flour | Rice flour, corn starch | Toasted quinoa, almond meal, tapioca |
| Sugars | Multiple (syrups + cane) | Light brown sugar (single source) |
| Binder | Xanthan listed | Xanthan 5–6 g |
Serving Ideas, Storage Tips, and Bonus Uses
I often keep a jar of crumbs on hand so I can pull together a quick cheesecake crust in minutes. These little rounds work both as an everyday snack and as a building block for desserts.
Everyday treats and dessert builds
I serve these biscuits with tea or coffee, or I half-dip them in melted chocolate and let them set on parchment for a simple upgrade. For a cheesecake base, I blitz cooled cookies into fine crumbs, mix with melted butter, and press into a pan for a nutty crust.
I also use crumbs as a crunchy layer in parfaits or to top yogurt and fruit. Keep a jar of crumbs ready and weeknight desserts come together fast.
How I store for best texture
Always allow the batch to cool completely on the tray before moving to storage. This step lets steam dissipate so the snap stays crisp inside an airtight container.
- I store at room temperature in a sealed tin for several days; in humid weather I tuck a paper towel inside to absorb moisture.
- If a biscuit softens, I refresh it with a brief, low-temperature bake until it smells toasty, then cool to re-crisp.
- I cut biscuits with a tidy ring so they stack neatly for gifting; clean edges travel better and look more professional.
- Freeze unused dough rounds to bake fresh cookies on demand and tailor batch size to need.
Quick tip: keep a small jar of crumbs for cheesecake nights and emergency toppings. It saves time and makes the most of each bake.
Conclusion
A few careful steps turn simple pantry flours into a crisp, bakery-style biscuit you can count on.
Toasted quinoa flour, a precise binder, and fully worked butter give these digestive biscuits their classic bite. Start with the base recipe, then dial butter and sugar within the tested ranges to tune richness and spread.
The method is straightforward: rub in, bring together, chill, roll, cut, and bake for the minutes noted. Trust the dough feel—practice makes future batches faster and more consistent.
Keep some cut rounds in the freezer so you can bake fresh digestives on demand. Thanks for baking along—share your tweaks so we can keep improving this recipe together. I’m confident your next bake will be your best yet.
FAQ
What flours do I use to recreate the classic texture?
I blend toasted quinoa flour with almond meal and tapioca flour to mimic that sandy, slightly crumbly texture. Toasting the quinoa lifts flavor without bitterness, and the tapioca adds lightness so the cookies aren’t dense.
How much xanthan gum should I add for structure?
I recommend a small pinch—typically 1/4 to 1/2 teaspoon for a batch made from about 200–250 g of flours. That amount gives reliable lift and binding without a gummy mouthfeel.
Can I use a food processor or should I mix by hand?
I use a food processor for speed and consistency when cutting cold butter into the dry mix, but I also hand-finish the dough to check texture. The processor gives even distribution; hands let me feel if the dough is too wet or dry.
How do I know when to add milk to the biscuit dough?
I bring the mixture together slowly—add a tablespoon of milk at a time until the dough holds in a rough ball but isn’t sticky. If it feels like play-dough, stop. If it crumbles, add a touch more milk.
What’s my oven temperature and bake time for light brown, crisp results?
I bake on a lined baking tray at 350°F (175°C) for about 12–15 minutes, watching for light brown edges. Cool completely on a rack to achieve the best crisp texture.
How do I cut biscuits cleanly without them spreading?
Chill the dough until firm, roll on a lightly floured surface, and use a sharp cookie cutter. Press straight down; don’t twist. Transfer to the tray with a thin spatula and return to the fridge for 10 minutes if they lose shape.
What happens if the dough is too dry or too wet?
If it’s too dry, the biscuits will crack and feel sandy—add milk by teaspoonfuls. If too wet, they spread and flatten—chill the dough to firm it up and add a little more almond meal if needed.
Can I swap almond meal for another nut flour?
I prefer almond meal for flavor and fat content, but hazelnut or sunflower seed meal can work. Expect subtle flavor shifts and slight differences in spread and color.
How should I store my baked biscuits to keep them crisp?
I cool them completely, then store in an airtight tin with a sheet of parchment between layers. Keep at room temperature up to a week. For longer storage, freeze in a sealed bag and thaw on the counter.
Any tips for using them as a cheesecake crumb or cookie base?
I pulse cooled biscuits in a processor to fine crumbs. For a cheesecake base, mix crumbs with a little melted butter until it holds when pressed. Bake the crust briefly to set before adding filling.
How do I prevent quinoa flour from tasting bitter?
I toast the quinoa seeds to golden—watch closely so they don’t darken. Then I grind in a blender or processor to a fine powder. Toasting shortens bitterness and brings a warm, nutty note.
What range of butter and sugar do I recommend for different results?
For lighter cookies I use about 110 g butter; for richer, up to 125 g. Sugar between 50–75 g controls sweetness and spread—lower sugar keeps them tighter and less brown.